
I know it’s been a while since my last post, but i have been so busy with house projects I just haven’t had time to write about them. Now that I’ve finished a few, there’s going to be lots of posts, so get ready to make stuff!
So, I’ve hated my kitchen floor pretty much since we moved in to this house 4 years ago. It’s bland and generic, and the only thing that’s kept me from ripping it out over the years has been it’s low maintenance and ability to withstand the wear and tear of having 5 animals walk across it daily. Here it is in all of its uniform sheet vinyl glory (this is an old picture): But, a few months ago I noticed that a few of the seams were starting to become visible and it was only a matter of days until some dog, not naming names here, but a big dog, snagged his foot over one of the seams and tore up a corner. That piece kept getting walked on despite my attempts to glue it back down, eventually it came completely detached and that’s when I realized the entire vinyl seam runs right through the main part of my kitchen. I would have thought that rule #1 of flooring installs would be don’t place the weakest part of the flooring in the highest traffic area, but what do I know?
Anyway, I started researching flooring options only to realize I was a little limited. I wanted something that would hold up well to water, was easy to clean, relatively easy to install and required little subfloor prep. I considered going with tile (trevor and I installed porcelain tile in our last kitchen and I loved it,) but realized we would need to add cement backer board which makes the install harder. Plus, tile installs are just messy and a pain in the butt anyway.
I was also looking for an inexpensive option, so that I could have enough money leftover to do other upgrades. We were looking to cover about 230 sq ft, enough to do our kitchen and breakfast nook. This ruled out some of the pricier vinyl options like Smartcore luxury vinyl plank (which I love and we have upstairs in our den.) I was pretty sad when I started to realize we might have to go back to sheet vinyl or linoleum.
Then, one day on a trip to Lowe’s, I was perusing the flooring aisles and found those weird vinyl tiles that you see in stores, schools, and drab government buildings. VCT. Vinyl Composite Tile. Now, you might be thinking those aren’t for residential use! But, let me tell you they can be, if they’re done right. Done wrong they look like something from the Soviet era, but done right they’re charming in a retro kind of way. The color options are endless and you can create pretty much any pattern you want. Pinterest is flooded with awesome VCT floors, if you don’t believe me, just check. 😉
If you’re not sure what a VCT looks like, this is it: but you’ve definitely seen them. They’re everywhere, because they’re so practical. The tiles become stronger over time as you layer wax over the top so, although they appear “soft” when you lay them down they will become sturdier over time.
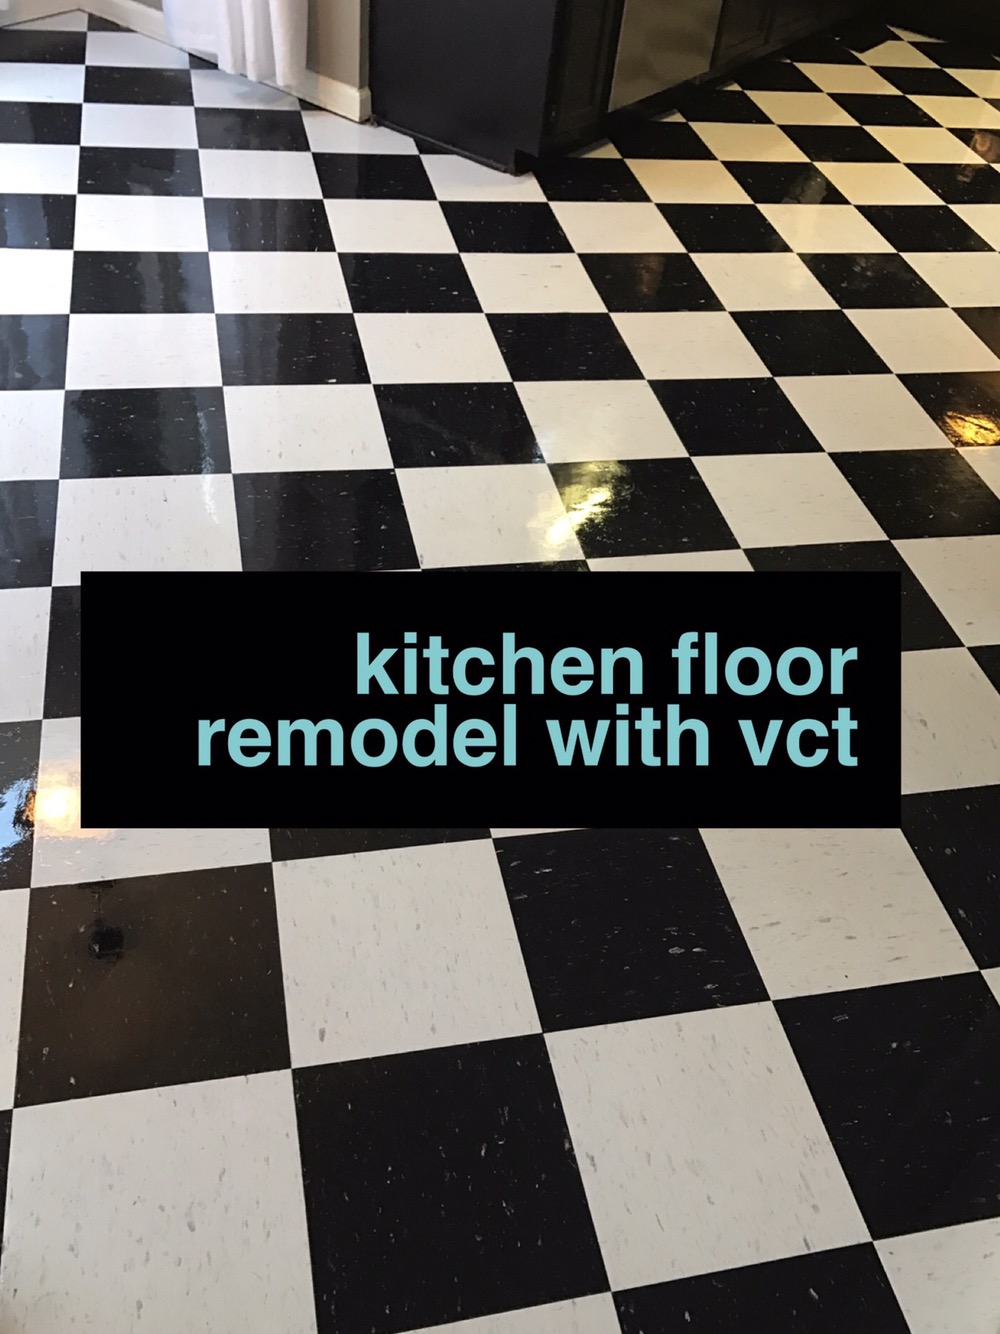
For our floors I decided to go with a traditional black and white checkerboard pattern, because I ❤ all things black and white.
I went with Tarkett VCT because it was in stock at Lowes and cheap, like 77 cents a sq ft cheap. You can’t beat that. I also decided I wanted it to have a high gloss finish so it would look more like a marble tile when polished, not ceramic tile. To get that look I found a wet-look floor polish made by Zep that gave it a nice shine.
I’m so excited about these floors. They turned out amazing! And it really only took one solid weekend of work. It’s not a hard project there’s just a lot of down time because of how long it takes for the glue to dry.
If you want new floors too, on the cheap, here’s what you’ll need:
- VCT in whatever color you choose. I’m not good at cuts, so I figured I needed 20% extra for waste. If you’re good at math and using sharp implements you could probably calculate for less waste
- Glue made specifically for VCT. I used Henry Commercial VCT Adhesive
- Small Notched Trowel
- Rubber gloves
- Sharp utility knife
- Tape measure
- Chalk or pencil
- Rayon string mop
- Clean Bucket
- Zep Commercial Floor Sealer
- Zep Commercial Wet Look Floor Polish
- If you don’t have paint thinner or mineral spirits you might want to pick up a small bottle just in case you get adhesive somewhere it’s not supposed to be and it dries….that may have happened to me a lot. 😬
The first thing you need to do is prep your workspace. VCT can be installed over existing sheet vinyl and other substrates as long as they are smooth with no rough spots. Mine was in ok-ish shape but I decided not to risk it. I peeled it up so the VCT could be installed directly over the subfloor. You will also need to remove your floor moldings. I left my baseboards and just detached the quarter round and trashed it. Mine was gross looking, but if yours is in good shape you could definitely reuse.
Once your floor is prepped, you can go ahead and spread out your adhesive in a manageable area. You always want to start in the center most point of your floor so you don’t have weird edge pieces. Your first few pieces have to be almost perfect so your surrounding rows will be straight. 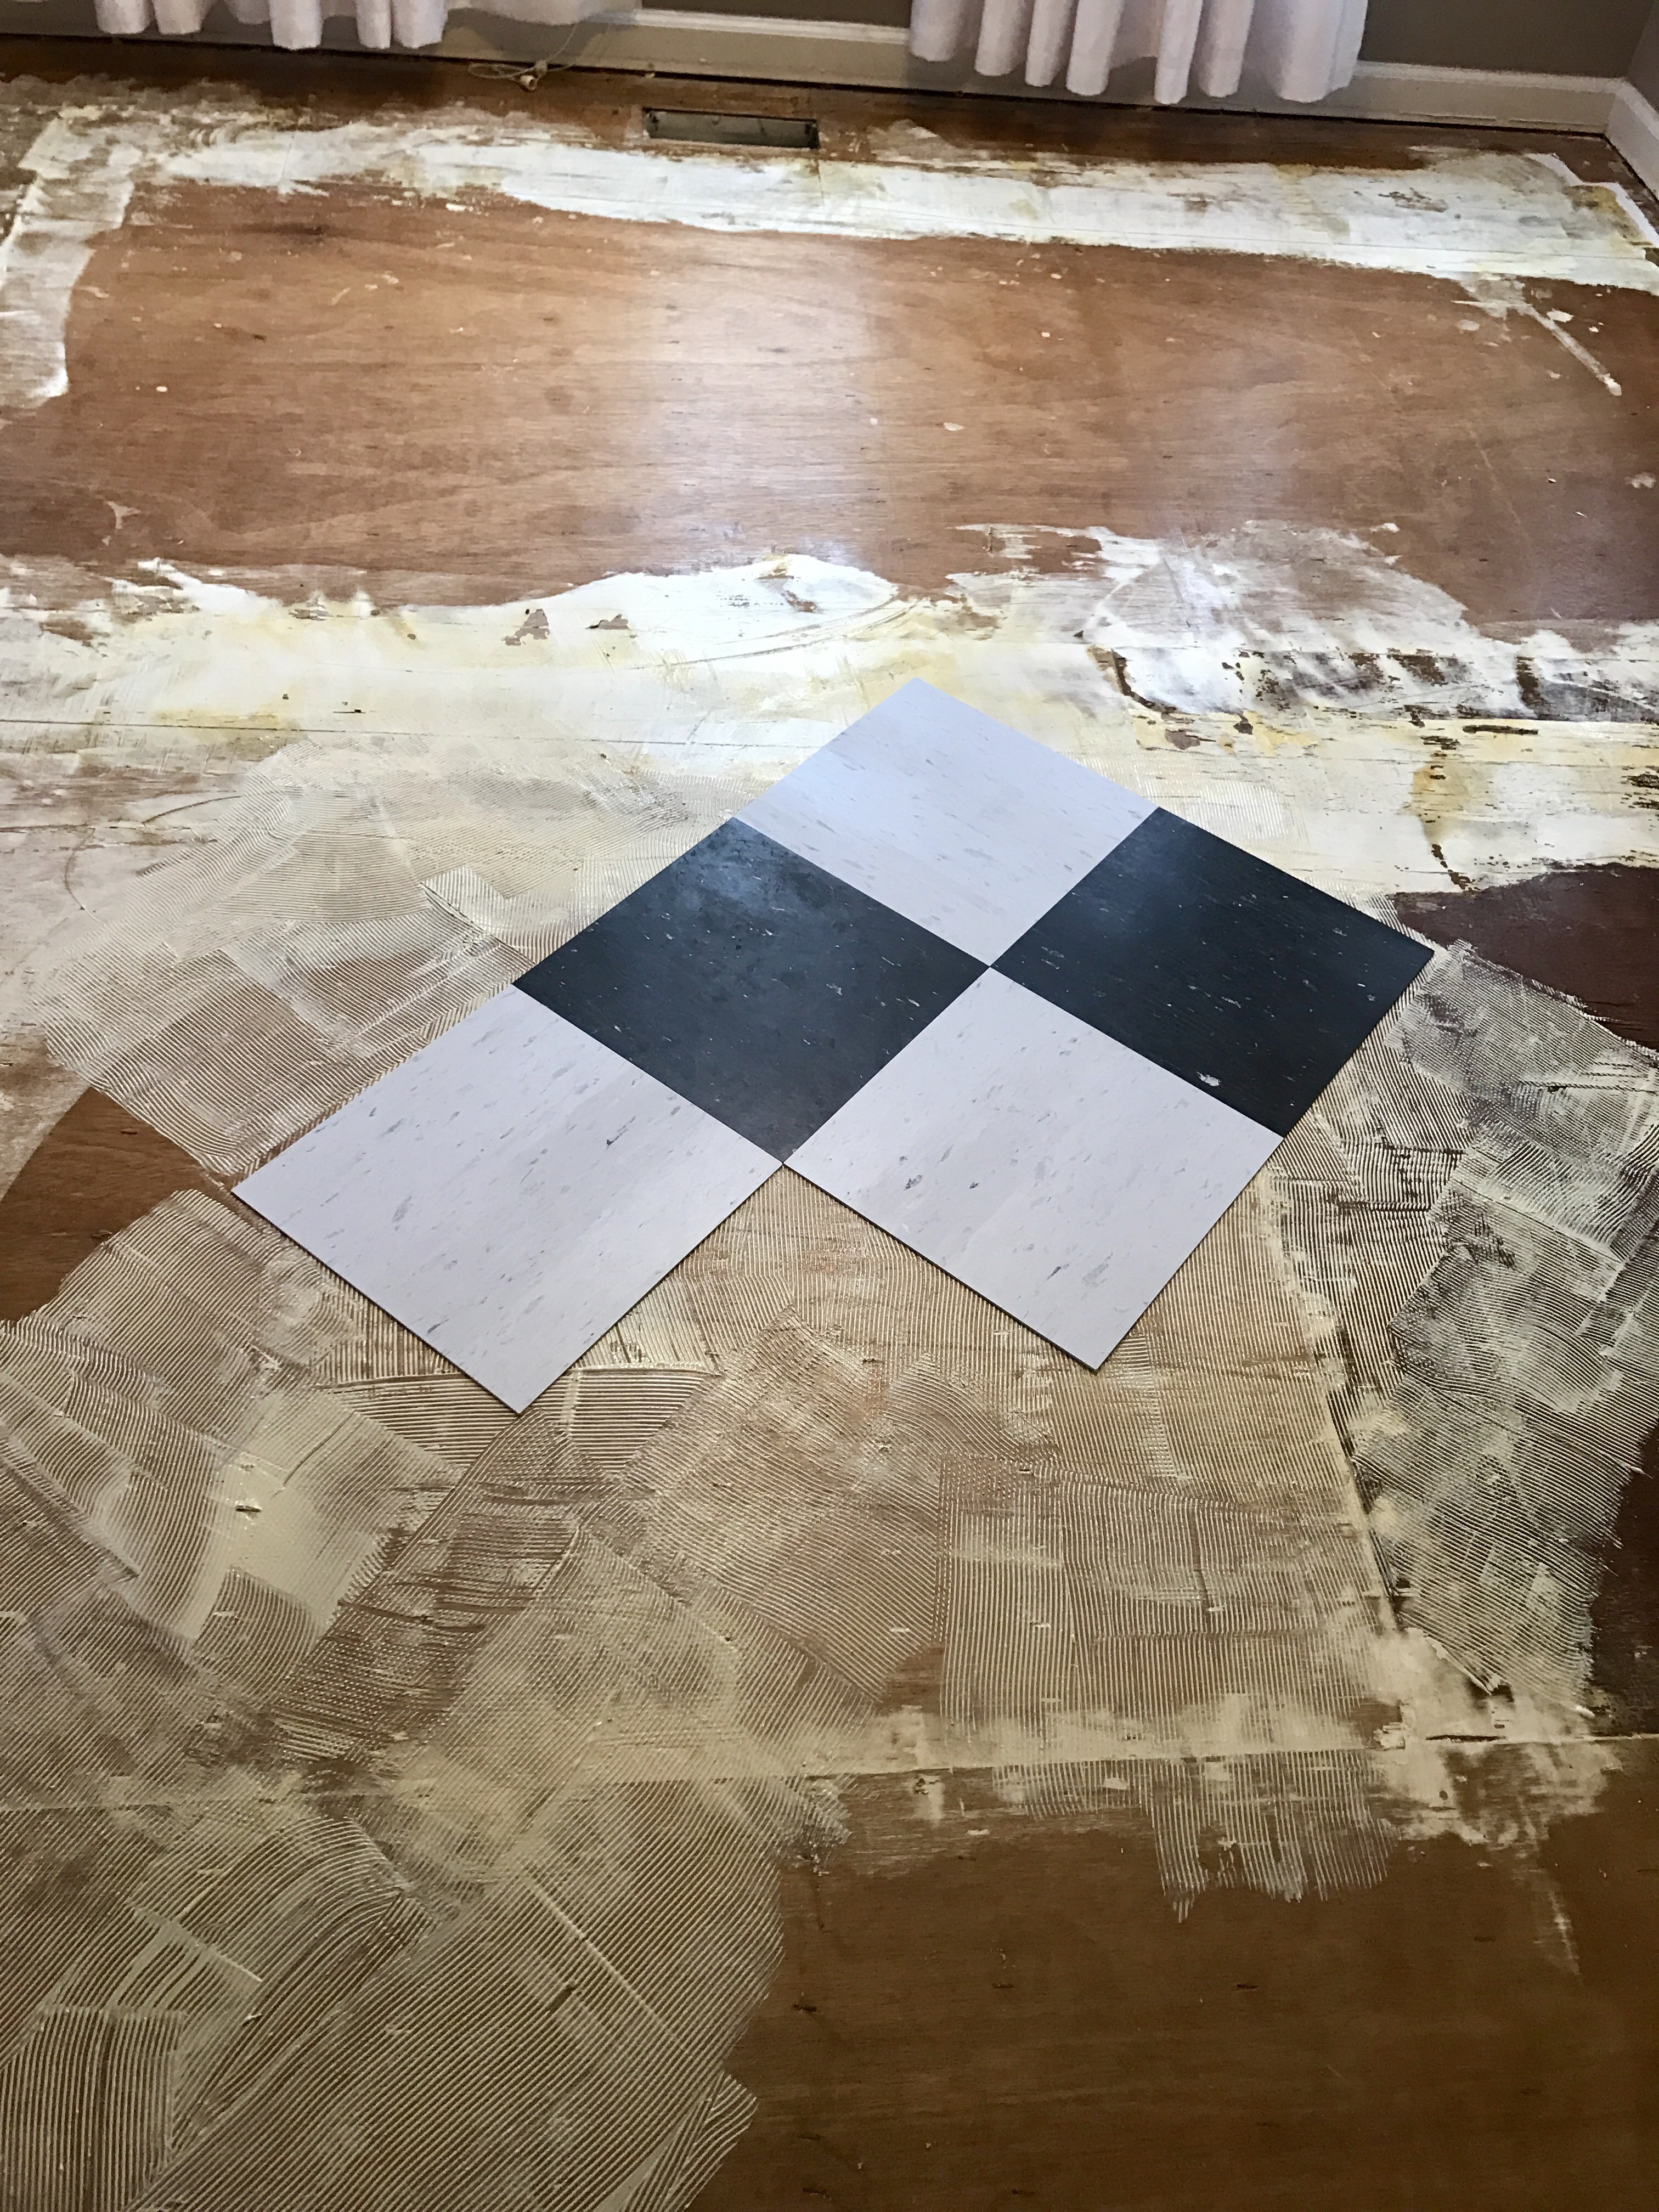 Once the adhesive is spread you need to let it get tacky before you lay the tiles, which takes about 90 minutes. The adhesive takes about 24 hours to cure so even after 90 minutes it will be repositionable.
When you get to the edges you may have to make some tricky cuts if you lay your tiles on the diagonal. If you are going with a straight pattern it should be significantly easier. Keep in mind when making your cuts your moldings will cover up the ugly edges and you can caulk around the trim if need be.  As you work, make sure you wipe up any rogue adhesive, with a wet paper towel because once it dries you’ll need mineral spirits. Also make sure you don’t work yourself into a corner, it’s easy to do.
When you’re finished laying the tile you need to wait at least 2 days before you seal it. Give the entire floor a good sweeping, before you apply the sealer because any dirt at all will get trapped in the polish and not gonly be you a smooth finish. While applying the sealer make sure you spread it thin with a rayon mop. If you apply thick coats it will turn hazy and opaque.
Wait 30 min for the sealer to dry before you began applying the polish. The directions call for 4 thin coats of polish, applied in the same fashion as the sealer, but I did 5 just that make sure it was nice and shiny. 
…and your floors are done! Yay. Go have a glass of wine and marvel at your handy woman skills. 😊


PawPaw Bryan would be soooo proud of you! Mama
LikeLike
You go girl! Looks very nice. We are also doing a kitchen reno..can’t wait for it to be done!
LikeLike